 |
| Drinking Girl - Photoshop Manipulation |
Hello Everyone, Today, In this tutorial, I'll show you an awesome and creative Photoshop Manipulation technique. By following this tutorial, you'll able learn how to balance light, color combination and some special magic. Also you can learn how to use 'Camera Raw Filter' easily and how to replace sky by using Adobe Photoshop. So friends, Let's start our today's mission.
[Note: I have done this work by utilizing Adobe Photoshop CC 2017. It might be work on Adobe Photoshop cs 6, cs 7, CC 2014, CC 2015 and CC 2017.]
STEP 1
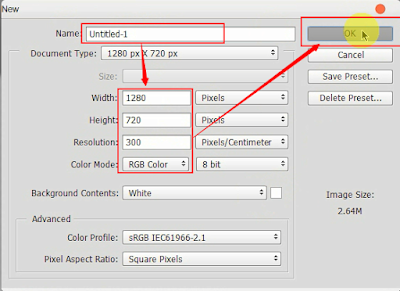
First of all, download all stock images from above link. Now open Photoshop on your desktop. Now go to file and select a new page. Set the name, "Photoshop Manipulation Under Water". Set width, 1280 pixel, height 720 pixel, resolution, 300 and Color Mode RGB. After all, hit OK.
Now create a new Layer in 'Layer' panel.

Select 'Grey' color from color picker. And go to Edit > Fill > Foreground Color and then hit OK to fill the new layer with 'Grey' color.

STEP 2
At this moment, import the nature background image in Photoshop. Press Ctrl+T to transform and set it in good position.

Notice the screenshot below. You need to click the circle icon first. After that, you will find multiple option. Just select levels. And take the action, that we showed at the image below.
Now select the layer of 'Levels 1' and click right button and click 'Create Clipping Mask'.

STEP 2
Import the 'Sky' image from stock images folder. Select the layer of sky and hit on 'Mask Icon'. Now select 'Gradient' tool from left bar of Photoshop. And right now, go to middle of the image and press and hold left button of your mouse and drag top and release. Please have a look at the image below.

STEP 3
In this step, you need to open the 'Water' image in a new window of Photoshop. Now select 'Rectangular Marquee Tool' and select wave area. Go to Edit > Copy to copy selected area.

And go back your working window and press Ctrl+V to paste the wave. Now press Ctrl+T to transform the layer and drug it left side. Follow the screenshot below.

Select the layer of Wave and hit on 'Mask Icon'. Now select 'Gradient' tool from left bar of Photoshop. After that, go to middle of the image and press and hold left button of your mouse and drag down and release. Follow the image below.

STEP 4
Create a new layer above all layers from 'Layer Panel'. Now select the 'Rectangular Marquee Tool' and select under wave area. Now select a sky color from color picker and press Ctrl+Delete or Ctrl+Backspace. At last, set the opacity of this layer 45%.

Select the layer of Wave and mask it by clicking 'Mask' icon from Layer Panel. Now select 'Brush Tool' from left bar and erase unnecessary area of the 'Wave' image.

STEP 5
Open the girls image and cut its out by using 'Pen Tool'. After cutting the image background, drug it in our main work-space.

Now select the layer of the girl and mask it by clicking 'Mask' icon from Layer Panel. Now select 'Brush Tool' from left bar and erase by following the screenshot below.

STEP 6
In step six, you need to open the 'Old Drum' image in a new window of Photoshop. Select the quick selection tool from left bar of Photoshop.Anyways, mark around the first Drum and press Ctrl+C to copy the drum.

Now back to main window and press Ctrl+V to paste the Drum here. Send the Drum's layer under the Wave's layer.
Now select the layer of the Drum and mask it by clicking 'Mask' icon from Layer Panel. Now select 'Brush Tool' from left bar and erase by following the screenshot below.

STEP 7
Open birds image above all layers. And set the opacity 20%. In the same way, open the Dolphin's image in Photoshop from stock images gallery. Go to Image > Hue/Saturation and decrease the saturation and hit OK.

Now select the layer of the 'Dolphin' and mask it by clicking 'Mask' icon from Layer Panel. Now select 'Brush Tool' from left bar and erase by following Step 6.

STEP 7
Create a new Layer above all layer and go to Image > Apply Image.
Now go to Filter > Camera Raw Filter and set that option by following this screenshot. After all, click OK.

At last go to Filter > Nik Collection and select your desired effect and click okay.

You have understand properly. If needs any kind help, do not hesitate to comment below.
If you did not understand properly by following our text tutorial, don't tension. Cool! We've also created a video tutorial only for you. Check below and Enjoy.


Where is the girl image
ReplyDeleteplease give me your computer all stock item..s thanks
ReplyDeletePost a Comment